The bank statement of an expatriate resident must show that he has earned six months’ salary credit. Nowadays, family residence visas are also delayed. Most expatriates bring their families with them on family visit visas and convert them later into family residence visas in order to overcome this time barrier.
The purpose of this article is to guide you through the process of converting a family visit to a residence visa, including the required documents, fees, and other factors you need to consider. You will find this article helpful whether you are moving to Qatar for work or to join your family.
Can I Convert the Family Visit to a Residence Visa?
The answer is yes, you can convert a family visit to family residence visa without exiting the country. It is important to note, however, that this can only happen once your family residence visa application has been approved.
If you haven’t started the application process, check out our detailed guide to family visa application.
How To Convert Family Visit To Residence Visa in Qatar
The following steps need to be followed after your family residence visa application has been approved:
Step 1: Pay Family Residence Visa Fee
You can pay the QR 200 RP visa fee through your Metrash mobile app or at any MOI Service Center once you receive notification that the visa is ready. Now the visa can be printed from the MOI website.
Step 2: Change Visa Type
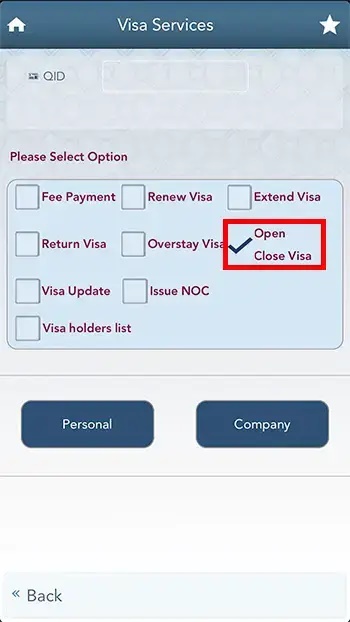
It is possible to change the type of visa either through the Metrash app or directly at any MOI Service Center. For each family member who wishes to change their visa type without exiting the country, there will be an additional fee of QR 500. Bank cards should be used to pay this fee.
Option 1: Change visa type on Metrash
Upon paying the visa fee (QR 200) on your Metrash app:
- Go to “Visa Service”
- Select “Open Close Visa”
- Select “Personal”
- Click “Next”
- Enter old (Visit) and new (RP) visa numbers
- Pay QR 500

It will be confirmed and you will receive a receipt. Print the receipt for the next steps.
The MOI Service Centres will be able to assist you if you encounter any errors during this process.
Option 2: Change visa type at MOI Service Centre
When you have paid your visa fee and printed your visa (QR 200), go to any MOI Service Center. The Captain should convert family visit visas into residence visas.
The documents you need to carry are:
- Sponsor’s Qatar ID
- Family’s original passport
- Visit Visa copy
- Residence Visa copy
Visit to RP Conversion Receipts are sent after payment.
Step 3: Update Medical Test Result
If you have not done the medical test for a visit visa extension, you will need to do the full medical test at the Medical Commission.
If you have already completed the medical test for the visit visa extension, you do not have to do it again. You will need to go to the Medical Commission and request a change of medical status (visit visa to residence visa). Regular health checks are recommended.
A QR 100 fee per family member is required to update the status in the system. Bank cards are accepted for payment of this fee.
The documents you need to carry are:
- Sponsor’s Qatar ID copy
- Family’s original passport
- Visit Visa copy
- Residence Visa copy
- Visit Visa Medical Receipt
- Visit to RP Conversion Receipt
Your visa copy must include the sponsor’s mobile number as requested by the Medical Commission staff.
Children under 15 are normally not required to complete this step. The next step is to check if the “Issue Residence” option is available on Metrash after the visit visa has been converted to an RP visa. The Medical Commission must be paid QR 100 if it does not appear. The original passport and copy of the visa are required for the child.
Step 4: Fingerprints Process
Fingerprinting is the next step. All MOI Service Centers (except Wadi Al Banat / Al Duhail) offer this service. Under-15-year-olds are not required to complete this step.
The documents you need to carry are:
- Completed application form* (may not be required at some MOI centres)
- Sponsor’s Qatar ID copy
- Family’s original passport
- Passport copy
- Residence Visa copy
- Medical Receipt
- Visit to RP Conversion Receipt
A typing center can fill out this form for you. During the same time, you can also have the Qatar ID application typed (needed next).
Step 5: Apply for Qatar ID
After applying for the Residence Permit Card (Qatar ID), the final step is to obtain it.
MOI Service Centres or Metrash can help you with this.
Applying Qatar ID at MOI Service Centre
Qatar ID can be obtained directly from any Ministry of Interior (MOI) Service Center.
The documents you need to carry are:
- Completed application form (download link)
- Sponsor’s Qatar ID copy
- Family’s original passport
- Residence Visa copy
- Medical Receipt
- Visit to RP Conversion Receipt
- Passport-size photo (blue background)
The cost of a Qatar ID for the first year is QR 500. The Qatar ID cards will be printed within 5 minutes after the fee has been paid.
Applying Qatar ID on Metrash
The following steps will also work on Metrash:
- Metrash2 should now be open
- Go to the “Residency” section
- Select “Issue Residence Permit”
- Details must be entered
- You will need to upload a passport-size photo (with a blue background).
- Photograph and upload a family member’s signature. (For children, upload a piece of paper with their name on it).
- QPost delivery charge of QR 20 plus QR 500
You can track your QID delivery on the MOI website. Use the sponsor’s QID number as the tracking number.
Conclusion
How To Convert Family Visit Residence Visa in Qatar is a multi-step process involving visa fee payments, medical and fingerprinting procedures, and finally, applying for the Qatar ID.
By following each step carefully, expatriates can smoothly transition their family’s stay from a temporary visit to a long-term residence.
